My brother's wife asked me yesterday if I might want to reupholster her sister's chair. I haven't done any reupholstering yet but I was ready to try!
I ran by Home Depot this morning and picked up this guy...
It's an Arrow T50PBN Staple/Brad Nail Gun. It's "heavy duty" and I liked that it does brad nails as well. You just never know when you'll need a nail gun and my husband's air gun is a little intimidating and a lot of work to get all situated. As I read that aloud my son reminded me that it's REALLY loud too, hahaha.
I should mention that this staple gun was NOT loud. Usually the noise of stapling will make me jump over and over, but this one was nice and quiet.
Here's the chair:
It was handed down to them by family. Isn't it gorgeous?? Well, if you ignore the pink seashell fabric ;)
The cushion just sits on four corners underneath, no nailing or screwing required, which is nice.
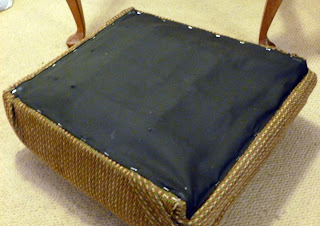
I started by removing the black fabric that covered the bottom of the cushion. I used a flat head screwdriver to pry up the staples and if one end got stuck I used a pliers to pull it out.
After that I laid down the fabric and cut a piece big enough to cover the cushion. I started by stapling the fabric across the front making sure that the pattern was straight.
Then I stapled a few times across the sides and back just enough to hold it in place with the pattern very straight.
Then I tackled the corners.
I just folded them over like wrapping a present, stapled, then trimmed off extra fabric and stapled some more to hold it really well.
Of course, there were some obstacles. Trying to make sure the back corners matched each other perfectly, and the front corners, well, let's just say I was a little stressed!
See how the fabric is stuck in that crevice there?
It made the front corners just a little complicated :)
When I finished all of the corners and tested out the cushion in the chair a few times I re-attached the piece of black fabric over the bottom. I just stapled it back on trying to cover any of the other staples that were holding the seat fabric in place. Basically, just making the whole thing look tidy and finished.
I staged it in my living room, but if I'm able to I'll get a picture of it in it's new home for you. It's going in their home office. Isn't that fabric perfect for a home office? It also was very durable and not stretchy at all, which made it very easy to keep the pattern straight.
Well, I guess that will be the last project of the year for me. I have a lot of things in my mind for this next year. I hope to refinish a lot of furniture and get really creative with it. Furniture does seem to be my #1 passion.
I'm also planning on making our office into my sewing room/project room. It's in the basement and is where I paint my furniture when it gets too cold in the garage. I have a lot of sewing projects for that room that I've been busy pinning on Pinterest. :) In fact I just ordered some fabric to make a cover for the sewing machine I received for Christmas :) I can't wait for it to get here!!!!!
Linked up to:


I can't believe that is your first attempt at reupholstering! You are amazing! Love how it turned out, and I agree that fabric is great for a home office. Thanks for sharing!
ReplyDeleteHeidi - Thank you SO much! It could not look better! I think you have a true talent for this. I am so impressed! I can't wait to see the pieces you do in the future!
ReplyDeleteThat was me - Angela!
ReplyDeleteyou did a great job. love that chair.
ReplyDeleteFollowing you from thrifty decor chick-stop b y for a visit!!
ReplyDeleteI'm so glad you like it Angela, I was super happy to do it!! :)
ReplyDeleteThanks for following Claire, I appreciate it so much!!
I've got a few chairs that need recovering. Thanks for posting the tutorial. I'd love for you to link up to my new "Thriving on Thursdays" linky party here in Australia every week. My blog features recipes, crafts, decorating, organising and decluttering advice and tips. I know everyone in Australia would love to read this blog post.
ReplyDeleteThanking you,
Anne @ Domesblissity xx
You did a great job! It looks good!
ReplyDeleteIt's amazing what a little fabric can do! Glad to have you at Things I’ve Done Thursday!
ReplyDeletehttp://www.bearrabitbear.com