February 26, 2013

More Market Signs

I got such a great response to my market sign and I enjoyed making it so much that I decided to make a few more this past weekend. I stuck with Market for these two but I plan on making more this week with different sayings.


This one is done with Annie Sloan chalk paint in primer red with white letters and a white border.


It's distressed and waxed with clear wax.


This one is done in Annie Sloan's pure white with primer red for the letters with a red border.


Again I distressed it but waxed it with clear and then dark wax to age it more. The pure white just looked way to clean and new!! ;)

I'm going to be putting them on my shop! page. I know that I could sell them on Etsy too but I haven't had time to explore and figure out selling there yet.

----------------------------------------

I was excited to get started on a new piece of furniture right away this week so I went out to the garage to look over my stash of projects waiting to get worked on and picked out a pair of chairs that need painting/reupholstering. 

I thought I could quickly remove the fabric and maybe even get started on the painting during naps yesterday...


But after about 3 hours of pulling staples I still am not done :( The good news is this chair was made and upholstered VERY WELL! But I think the stapler person kinda over did it on the staples....

Oh and did I mention that those 3 hours were all spent on ONE chair?! I haven't even started the 2nd one. sigh.


February 20, 2013

French Linen Secretary

I feel like I've been getting so much done lately. It's a great feeling. But then the feeling of exhaustion catches up with me and that's not so fun.

This week I finally finished a piece of furniture  I started way back in October. The good news is it was so worth the wait!


I ended up having to completely flip-flop the original color scheme I was going for after my first attempt with milk paint failed miserably. But I think it was a happy accident because in the end the way the white shows through where I sanded off the French Linen is just gorgeous.


After searching various cabinets and cupboards I was surprised by how many aqua ball jars I actually have. They don't even really match my home's decor but I just can't resist them at garage sales! Eventually when the basement is decorated they will match down there so they won't go to waste :)

This tall secretary was given to me by a family friend. Here's how it started.


Like I said at first I was going to have the insides be gray and the outside white.


But when my milk paint completely flaked off (which miss mustard seed said could happen!) I had to change things up. FYI this was just a fluke thing, I've had success with milk paint since then :)


After sanding it I had to prime it, then I tried painting it white with chalk paint but it just looked blotchy and bad. So I gave up for awhile. This week I decided to give it another chance and tried painting it in French Linen chalk paint. Sure enough, it looked great. But this meant the inside had to be primed and repainted in white! Sigh, nothing like doing a job twice before getting it right ;)

After sanding all the edges and corners I waxed it with Annie Sloan clear wax. Then I had lots of fun staging it. My favorite part was looking through the black & white photos my dad gave to me from my Grandma and finding the perfect one to frame.


That's my super handsome Grandpa :)


This piece is for sale, you can find details in my shop page.


February 16, 2013

Cleaning Rusty Dishes

Rusty dishes?? Yes, rusty dishes. If you have well water you probably know what I mean. Anything white that you own turns orange. Your sinks, toilets, tubs, clothes, and even dishes. 

When we got married we didn't register for china, we're just not fancy people. So instead we registered for a nice white set of dishes from Crate & Barrel. Versatile and pretty they were sure to last us a long time. At least that's what I thought until we moved into our current house and they started turning orange :(

But the other night on a whim I tried washing them with something new and something magical happened...


They turned a gorgeous, bright white again!!!

These pictures don't even capture the amazing difference that there was. As I said I was doing this on a whim at night and when I saw the results I knew I should wait until daylight so I could take better pictures and share it here but I just couldn't help myself!!! It was like I was getting brand new dishes again and with my new open cabinetry and all of my dishes now on display this was even more of a big deal! 

So what is this magical cleaner that can make your rusty dishes like new again? Toilet bowl cleaner. The Works toilet bowl cleaner to be exact. 


I used it on my glass drinking glasses also and it took away the yellow tinge that they had! 

Now here's the important part. WASH YOUR DISHES THOROUGHLY AFTER USING THIS ON THEM. Any cleaner capable of cleaning away rust like that is obviously very strong and not to be ingested ever. So after rinsing them I then washed them all in the dishwasher as well. 

A couple more pointers: Wear rubber gloves while using this cleaner. Clean the dishes in your bathroom sink or bathtub. I did it in my stainless steel sink and it caused a little discoloration of the stainless steel. 

Still with all of that being said, I use this cleaner on my toilets and sinks and tub on a weekly basis. It is the only cleaner I've found that is capable of getting the yellow stains out!

If you don't have well water and don't have to fight the rust fight on a daily basis, well good for you! ;)


February 14, 2013

Handmade Market Sign


So as I sat in my kitchen being lazy and do nothing, as I had all day today, it occurred to me that I promised to show a tutorial of the Market sign in my kitchen!! And I had said I'd share it the next day, which was 2 days ago!! Whoops.

So I just took a few pictures of it while the sun is already half down and storm clouds are rolling in. Sorry if they're not the best. My camera stinks anyways....but I'm half way there to my dslr :)

I made this sign with a piece of scrap wood I had in my garage. It was a 1x8 that was about 3 feet long. I painted it with Miss Mustard Seed's milk paint in Boxwood green. It was my first time using it and I love the color!! My bottom cabinets might be going this color in the near future.

(yeah, ignore the nasty, stained carpet)

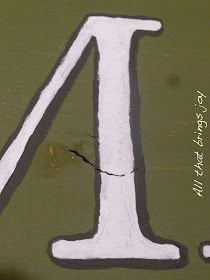
I found a font I liked and tested a couple of M's until I had the right size, then I printed out the ARKET :) I went with the font Adobe Caslon Pro in size 500. 

I colored over the back of every letter as I always do when tracing...


But this time when I went to turn them over and trace over the front of each letter the pencil didn't transfer onto the sign like I thought it would. So I tried again pressing extremely hard with my pencil. The pencil mark still didn't transfer but I had made an indention of the letter into the wood! So I took my pencil and followed the indention drawing the letter right onto the wood.


As you can see the wood wasn't perfect and the paint job wasn't either. I only did one coat but I liked how it already looked somewhat distressed so I just stopped there!

After drawing on every letter I took a tiny paint brush and painted them in with Annie Sloan Chalk Paint in pure white. Then I took a tip from Miss Mustard Seed and painted a tiny border around the sign. I also used a tip from Miss Mustard Seed and gave each letter a shadow.


To make a shadow you take black paint and paint around the whole letter making the bottom and right sides of each letter a little thicker. It gives the sign dimension and makes it look very professional.

After that I sanded the whole sign hitting the edges and corners extra well and then waxed it!


All done! It only took me one day and that was amidst babysitting, grocery shopping and preschool runs!


Oh yeah, I hung it on the wall with these. I love them, I use them to hang everything. It's low commitment because you know you can take it all off whenever you want without any damage!!


Sorry again about the delay posting this!! :)


February 12, 2013

Making Open Cabinetry


One goal for the month checked off my list!!


I ended up only removing 3 cabinet doors instead of 4. The fourth one all the way on the right had shelves that weren't adjustable so there was no way to make them line up with the shelves on the cabinet next to it. Plus it's such a deep cabinet that styling it would mean wasting some major storage space. 

Here's a reminder of what the cabinets looked like at the beginning of the month.


Can you figure out what else I decided to remove at the last minute???


The scalloped edge trim above the sink and the 4 little shelves on the sides of the cabinets!! 


Oh I am SO happy about it too!! I had always wanted those things gone, it outdated the kitchen even more than the soffit for goodness sake. So I finally just got brave and wacked away with a hammer :) Okay I was a bit more careful than that and the trim ended up being nailed into the side cabinets so a Sawzall was required. I had Scott help me with that part.

After taking the doors down I decided to have Scott cut off the middle piece of this cabinet too.


I took off a couple layers of contact paper, sanded the areas we had cut, filled in any holes and got to painting!

When painting a small project I like use this trick.


I line my tray with tinfoil, fill it with just a little paint at a time and then I can just crumple it up and throw it away when I'm done. Easy clean up. I like that! 

This project ended up taking me about a week in all. It could've been done in a day really if I had had more than just an hour here and an hour there to work on it. But that's okay!

I'm super happy with how it turned out. And Scott is so happy with it that he can't stop talking about making the new doors for the rest of the cabinets! Yay :)


I bought the baskets at Target for about $14 each. They're hiding the kids' plastic cups, plates and bowls. 


Do you like the Market sign?? I made it! It was really easy, I'll show a tutorial tomorrow!

Okay, I had to really dig to find this, but I found a picture from when we first moved in 4 years ago. It had been so long since I'd seen a picture of it that I had forgotten what it looked like!


Yay for before and afters!!! :)


February 10, 2013

Cheap, Easy, Fun Valentines!!


It's Valentines Day!! Well almost :)

Oh how I used to love coming home with a bag full of pink goodies as a kid. The cards, the candy....the candy!!! I have a bit of a sweet tooth. And by a bit I mean that my girl friends gave me a themed gift for my birthday this year and the theme was CANDY. It was awesome :)

So you can imagine my disappointment to find out my kids' school doesn't allow passing out candy. Not only candy but you may not pass out anything other than a card, no pencils or stickers or anything. I understand that they are just trying to keep things healthy and fair, but come on. Sigh.

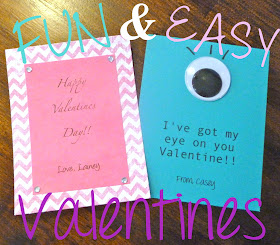
So in order to make sure this holiday is still fun and exciting we make our own cards. Nothing too extravagant or expensive, just fun, simple Valentines cards.


It only cost about $10 to make 48, 24 of each style. I got all the supplies at Hobby Lobby. The cardstock was on sale for 50% off and I used a coupon for the gemstones making them only $1.50. I can't remember for sure how much the googly eyes were but I think it was $4 for 2 packs of them without a coupon.

Here's watch you'll need:


(6 pieces of each style of paper, 1 pack gemstones, 2 packs of 12 googly eyes, glue stick, Sharpie, paper cutter)

I already had the paper cutter, glue and Sharpie. I don't craft much and never scrapbook but that paper cutter comes in handy SO often!! Love it! Oh and the blue paper came in sheets that were 8.5 x 11, I just already cut them, oops!

So to make the blue Valentines I started by getting the words printed on the paper (before cutting it!). I took some screen shots on the computer to explain it better. I use OpenOffice to make documents. 

There's a tiny little arrow by the 7 down there. 


Take that arrow and move it over to about 2 dots before the 3.


Then click on the button to center the alignment.


Your curser will now be centered into the top left corner of your document. I hit enter a few times until I was at about the 2 on the left of the screen to make room to glue the eyeball on later when it's printed.

To write "I've got my eye on you Valentine!!" I used the font Andale Mono in font size 28. Then I used the font Throw My Hands Up In The Air in size 20 to write "From, Casey". You can download that font for free here if you'd like. 

I printed that out on a piece of test paper to make sure it would be centered on the piece of paper after I had cut it into fourths later. Then I printed it on my real paper. After printing it once I then turned the paper around and printed again. Then since the blue paper was the same on the front and back I turned it over and printed 2 more times so that I ended with this message bring printed  4 times, once in each corner basically. Then I cut the paper into fourths.

My son glued the eye balls on with a glue stick and then used the Sharpie to make eyelashes. Plus I had had him pick out the paper and help with which fonts he liked so that he really felt like a part of the process. 

For the pink Valentines I started by cutting the chevron striped paper into fourths. It was also 8.5 x 11.


I made the message on these by following the same instructions. I moved the arrow over then centered the alignment, but I started writing right from the top without hitting enter at all. I used the font Zapfino in size 18 to write "Happy Valentines Day" and then the font Angelina in size 26 to write "From, Lainey". 

This paper was white on the back so I couldn't print on either side of it. So I started by printing in one corner and then in the opposite lower one. Then I cut the paper in half.


Then I took each paper half and printed on the blank half. I know this seems like a lot of extra flipping and flopping and printing but I couldn't figure out how get the text centered on the bottom and right half of the paper so I just did it this way :)


Now I wanted this pink paper to be smaller than the chevron striped paper so I had to get creative while cutting it. I started by cutting each of those up there in half. Then I lined the sides of the V right next to the ruler on my paper cutter. And I did that again with the side of the s on the other side.


This way the words are now centered. Then I cut the top and bottom the same way. 

Lainey used a glue stick to stick the pink paper on top of the chevron paper then she put a rhinestone in each of the pink paper's corners. They were self adhesive thank goodness!


And there you have it! I hope I didn't make it sound very complicated, it really was quick and easy. I did all of the printing and cutting ahead of time that way when the kids came to work on them it only took a matter of minutes to make them. I hope you have a wonderful Valentines Day and get to enjoy all of the people you love this week!!


Sharing at:
Two Little Birds Decor
One Artsy Mama
The Real Thing with the Coake Family
My Simple Home Life